Sep 29, 2013

Lazy Man's Pizza

Come home from a long night and was looking for a quick fix for dinner? I don't have much restaurants around my area and don't want to deal with takeout so usually find myself looking to cook something quick and hearty.

I usually find myself in this situation (and being a fan of Pizza) so I always have the following in stock in my fridge:

Jar of Pizza Sauce (or Tomato Sauce)
A Bag of Shredded Mozzarella Cheese
Flatbread

Optional Ingredient

Basil (Or whatever you want to top your pizza with)

With these ingredients and a standard Mini Toaster Oven, you can make what I call my "Lazy Man's Pizza".

The Lazy Man's Pizza

Makes Pizza for one Person

  1. Set your oven to bake an preheat the oven to 450 degrees. 
  2. Take some aluminum foil, prepare a square big enough to fit your flatbread. Lay your flatbread onto the aluminum foil, spread a few spoonful of Pizza sauce evenly onto it. Sprinkle the mozzarella cheese over the sauce, adjust accordingly depending on how healthy or have much cheese you want on the pizza.
  3. Even out the cheese and sauce on your flatbread pizza, then place your optional ingredients onto it and place it into the oven along with the aluminum foil. The aluminum foil would serve as your tray and make it an easy cleanup afterwards.
  4. Bake for 10 minutes then enjoy!
 It's no Lombardi's, but at least better than Dominos.... ^_-

Have it YOUR way! More than 60 Recipes for Delicious Homemade Pizza

Sep 23, 2013

Fish Fight


In the movie “Once Upon a Time in Mexico”, Johnny Depp’s character, Agent Sands, ordered Puerco Pibil from each restaurant he visited and compared it to the other iterations from restaurants across Mexico as a barometer of the status quo. The result of discovering version of the dish beyond the status quo was a horrific end to the chef who prepared it. In my case, I’d rather celebrate the dish and the restaurant that offers it.

 Of the restaurants I have visited with some level of regularity, if I find fish tacos on the menu, I will most likely give them a try. For those times that I would like a quick bite, a dish that is light but has some sustenance to it, I have found the fish soft taco to be the ideal choice.

Sampled at:

  • El Camion Ave A NYC 
  • Tolani W80th St NYC 
  • Mercadito Ave B NYC 


I’ll begin with my favorite, found at El Camion. Beer-battered codfish – cucumber slaw and avocado cream (flour taco). El Camion’s fish taco is presented as lightly coated and fried chunks of codfish. They are careful not to overwhelm the fish with the add-ons or taco shell. This balance permits you to recognize the prominence of the fish, the accent of the slaw/avocado, bound in the taco shell’s base.

Tolani, my number two, makes a pretty good fish taco as well. While the flavors, presentation, and creativity combine to bring a smile to my face, the “House Made Corn Tomatillo Salsa” slightly overtakes the personality of the fish.

 Mercadito, my least favorite of the fish tacos presented here is by no means lacking. Their sautéed tilapia, poblano-tomatillo mojo, avocado is very tasty, but the fish becomes lost in the midst. The corn tortilla, which also wraps Tolani’s fish taco, offers a level of authenticity that I appreciate. However, the rustic feel is not necessary and detracts from the texture of the fish. Perhaps corn tortillas should be reserved for beef, chicken, and pork.

 The beauty of this Fish Fight, or “recipeat” is how a simple and bland piece of fish (cod or tilapia) can take on such different forms and tastes with modest variations in the toppings and shell.

If you care to bring the taco fiesta home, check out "Tacos, Tortas, and Tamales: Flavors from the Griddles, Pots, and Streetside Kitchens of Mexico"for some great recipe ideas.

Sep 21, 2013

Easy Steamed Lobstas'

Lobsters are in abundance right now.  At a good Asian Seafood market you can get them for $4-$5 per pound.  Why go to a fancy restaurant only to pay the big bucks??  I will make it simple for you!  I like to do 2 lobsters per meal.  You can do as many as you like!

You need a nice pot that can fit your lobsters comfortably.  You don't want them on top of each other rather next to each other.  You also want a bowl or something underneath so that the lobsters can be perched on top of it and not soaking in the boiling water.  we want to steam these guys not boil them! 

I like to place the lobsters in the freezer for 15-20 minutes.  This puts them in a trance and they are easier to work with that way.  Also when you take them out of the freezer you can easily cut the rubbers off. 

Bring the water to a boil so you get a nice steam going.  Then place the lobsters one at a time.  I like to let them go for 8 minutes for the first pound and then 3-4 minutes for each additional pound.  Two one and half
pounders should take no more then 14-15 minutes.  When they are a nice bright red, pull them out and into an ice bath for a few minutes.  This will immediately stop the cooking process.  After cooling, just crack and enjoy!

For additional adventures in lobster dishes, I recommend: Chef Paul Prudhomme's Magic Seasoning Blends ~ Seafood Magic, 24-Ounce Canister

Sep 16, 2013

Cake pops at home

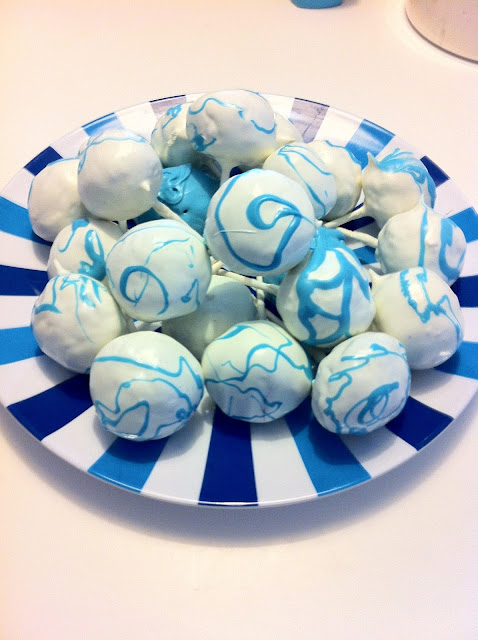
If the stands at the New York Food & Wine Festival last weekend were any indication, cake pops are taking over for cupcakes and pies as the next big dessert trend. Eager to try them out myself, I made these d Velvet cake pops for a surprise party I threw for my husband's birthday, and the guests agreed that they turned out amazingly well.

The only downside? They were a little too delicious and convenient. We began to convince ourselves that leftover cake pops taste great not only after dinner, but as an afternoon snack or with coffee in the morning!

Red Velvet Cake Pops

  • 1 box red velvet cake mix 
  • 12 ounces ready-made cream cheese frosting
  • 24-48 ounces white candy coating (also comes in different colors)
  • Paper lollipop sticks
  • Sanding sugar or sprinkles (optional)

Make the cake:

Bake the red velvet cake mix in a 9" x 13" pan as directed. Let cool completely, then finely crumble the cake into a large bowl and add cream cheese frosting until thoroughly mixed.
Here's where it gets messy: Roll the mixture into 1 1/2" balls and place them on waxed-paper-covered baking sheets. Cover balls with plastic wrap and put them in the freezer for 15-20 minutes.

Add the candy coating:

Place 8-12 ounces white candy coating, in a deep, microwave-safe bowl and melt in the microwave, stirring every 30 seconds. Do not overheat; if you cook it too long, the candy will start to harden and burn. I find it's better to work in small batches, and melt more as needed.

Place an upside-down colander on waxed paper. Working in small batches (and leaving remaining balls in the refrigerator), dip sticks in 1/2 inch of candy coating and then push into balls about halfway. Dip the ball into the melted candy coating until it is completely covered. Make sure the coating meets at the base of the lollipop stick. If excess coating starts to drip, hold the stick at an angle in your left hand and use your right hand to gently tap your left wrist, rotating the stick as necessary (this takes awhile to get right). When coating stops dripping, gently top with sprinkles or sanding sugar. You can also drizzle on a second candy coating color in different patterns, while the first color is still wet.

Prop the cake pop upright in a colander hole to dry. Repeat with the remaining cake balls and let them dry completely. Store in an airtight container on the counter or in the refrigerator up to 3 days.

Adapted from a recipe by Bakerella

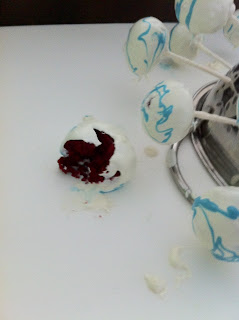
My personal advice? don't make the cake balls too big, or you'll end up with cake pop carnage all over the counter:  Cake pop carnage - what happens when you make them too big

Sep 15, 2013

Ramen Burger - Is it the Noodle Bun?


Ramen, the staple food for all frugal college students at one time or another. Barely any nutrients, high in sodium but comes in a variety of flavor, not to mention its dirt cheap for a pack.

Which leads me to the question, why is people lining up every weekend at Smorgasburg for Ramen with patty on it? Is the bun the main reason? If so, why not try to recreate the special bun so we can all have our own Ramen Burger?

While there's many variations of the recipe online trying to recreate this noodle bun, I find this one to be the best out of the ones I tried out.

The Ramen Burger Noodle Bun

Makes 1 Ramen Burger Bun

1 Pack of Instant Noodles (Any brand will do, for added flavor)
1 Egg

  1. Cook the Instant Noodles according to the directions on the packaging. For added flavor to the bun itself, add the flavor packages into the water when your cooking the noodles and allow them to soak in.
  2. After cooking till firm, extract the noodles and place them into a boil of cold or ice water to stop the cooking process.
  3. After a short dip remove them from the water and place them into a big mixing bowl. 
  4. Crack open the egg and mix it briskly, then add it into the bowl of noodles and mix till the noodles are nicely coated, the egg will serve as our bonds for our noodle bun.
  5. Prepare two small bowls (flat ones for the best results) and place equal poritions into them. Gently push down on top of them to compact the noodles into a nice uniform shape. Refrigrate for 10-15 minutes and let it set.
  6. In a small frying pan, prepare a small layer of oil sufficient enough for pan frying, allow it to heat up for 3-5 minutes on medium heat. Carefully flip over the bowls containing your noodles bun into the frying pan and pan fry the buns to your liking.


Finish off by cooking the patty of your liking, let it be beef, pork, turkey or even veterinarian. Afterwards, pat yourself in the back for not having to line up for hours at Smorgasburg for this!

You will never eat Ramen the same way again with the Ramen to the Rescue Cookbook: 120 Creative Recipes for Easy Meals Using Everyone's Favorite Pack of Noodles

Sep 11, 2013

Recreating a rockin' rocket salad


I can almost pinpoint my love of rocket arugula to the day. It was shortly after we'd moved to NYC, and we sat out on the back patio of a charming little Italian restaurant in East Williamsburg next to a gas station. (If you've been to Brooklyn, you'll know this is no reason to pass judgement on a restaurant - especially if there's a line of people waiting to get in.) 


We ordered some pasta or another, and a simple salad described only as "Rocket Arugula Salad with Lemon", I believe. It was amazing and nothing at all like the arugula I'd had before - light, fresh, with just enough acid in the lemon juice squeezed on top to offset the warmth of the extra-virgin olive oil, and sprinkled liberally with Pecorino, salt and fresh pepper. I've been recreating it at home ever since. 


Rocket Arugula with Lemon

Serves 2

4 cups of washed and dried rocket arugula (aka roquette)

1 lemon
4 tablespoons of extra-virgin olive oil (the best you can afford)
4 teaspoons of grated Parmesan, Romano or Pecornio cheese 
Kosher salt and freshly-ground pepper to taste

Divide arugula between two bowls. Squeeze half of the lemon onto each, holding your hand beneath the lemon to catch any seeds. Drizzle half of the olive oil on each, sprinkle with cheese and add salt and freshly-ground pepper to taste. If you're feeling adventurous, try substituting white pepper or adding a little pinch of hot pepper flakes.


One of the most important ingredients in this dish is a quality cheese, which can totally change the flavor of the salad depending on what you prefer. Want to learn about more great cheeses and what they can do for your other dishes? Check out The Cheese Lover's Companion book.

Sep 10, 2013

Nacho average beach fare


This summer, I had some amazing nachos at the Bolivian Llama Party stand at Rockaway Beach.  I have to admit, I wondered what Bolivian Llama Party nachos would taste like (Bolivia? Llamas? A party?) but the truth is, they tasted like summer—the kind of summer you spend napping at the beach, watching surfers and drinking beer. Here's my attempt to recreate them.

Bolivian Llama Party-style Nachos
  • Tortilla chips
  • Nacho cheese sauce, warmed (and I won't judge you if it came in a jar)
  • Black beans, drained 
  • Pulled pork (you can make your own or buy it at Trader Joe's) 
  • Fresh salsa (I like Rick Bayless' Pico de Gallo recipe)
  • Feta cheese, crumbled 
  • Cilantro, chopped

  1. Place chips on a plate.
  2. Pile on the ingredients.
  3. Chow down.
  4. Stretch out and admire your full belly (because yes, you will be eating all of them).
Go full nacho spectrum with Ultimate Nachos: From Nachos and Guacamole to Salsas and Cocktails.